Pages

Showing posts with label Mailbox Muse. Show all posts

Friday, July 28, 2017

Bubble Your Troubles Away


Happy Friday everyone.  My project this week allowed me to get messy, happy, painty fingers!  How?  I made several monoprints with my gel plate for the under-the-sea theme of today's card project.  The prints are in a variety of beautiful blues, greens and purples.  Lost Coast Designs has the most awesome background stamp which gave great motion to the "water".  A couple stamps from the Mailbox Muse mermaid kit complete the scene.

The how-to info for these two cards is posted over at the Altered Pages blog, which you can see by clicking HERE.


I have a lot more mermaid cutting out to do to put the rest of the cards together but I really want you to see how pretty the rest of these backgrounds are.


Products used:
Lost Coast Designs stamp
Gel Press Plate
Brayer
Assorted Acrylic Paints
Texture Tools
Gelatos
Water Brushes
Pigment Inks
Embossing Powder
Dye Ink
Sponges & Baby Wipes
Mailbox Muse Mermaid Stamp Set
Stamp Placer or Acetate
Foam Adhesive Squares & Glue 


Friday, March 11, 2016

Muse on the Nile

Marhaban!  That's how you say hello or welcome in Egypt.
 
My post today, which is also featured on the Altered Pages Artsociates blog, is two greeting cards and a tag using the wonderful Muse On The Nile stamp plate and the Egypt collage sheet.  I've also got an altered tag as a little bonus.
 
 
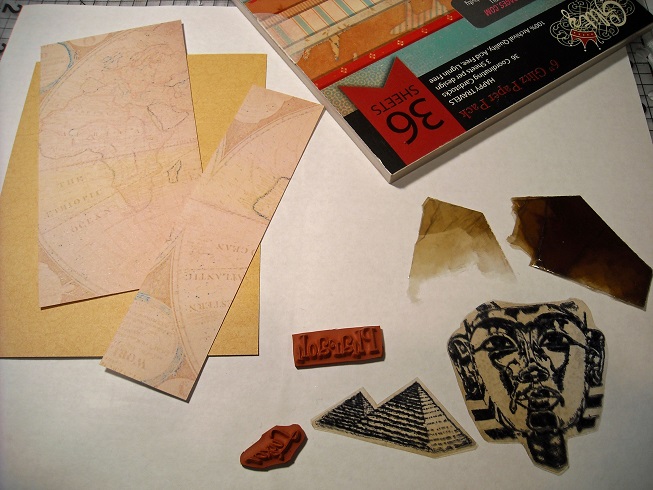
The first card I made has King Tut's face and the pyramids stamped on thin mica chips with StazOn ink.  When you stamp on mica be sure to use a steady hand because rubber stamps may slide a little if you aren't careful.  It's a little like stamping on plastic.  Notice how dark the mica started out?  It's a rock that is formed of paper thin layers.  You can pull them apart to get the color you desire.  The pieces were attached with a glue stick.  Don't worry, you can't see the glue.


There is a globe pattern in the Happy Travels paper collection from Glitz.  I trimmed it down so keep the side with Egypt and set aside the other piece for a project later on.  The yellow background is from a Graphic 45 paper pad and has a very faint crackle pattern that isn't really visible here.  I thought it went well with the ancient theme.  Once the mica was glued in place I stamped the words from the stamp plate around the images.  The words in black squares were cut from the Egypt collage sheet.
 
 
Do you like the shiny bling?  I had a scrap of gold foil from another project.  I set the metal sheet on a mouse pad and used the tip of my ScorPal stylus to create this random pattern.  Then I cut a random shape from the piece and glued it in place with tacky glue.  I paired it with a gold glitter layer so that the gold metal wouldn't be overpowering for the rest of the card if it was the only shiny element.
 
 
I thought this chevron paper made a great background for an Egyptian card!  It hints at a pyramid, doesn't it?  I bought a sheet of the Egyptian collage on parchment from Altered Pages so the Pharaoh had a vague yellow tint and a blue/black design and it paired beautifully with this Glitz design.  The paper pad also had a solid dusky blue sheet and I stamped the pyramids on it to match the background.  Foam dimension squares hold the pyramids a little off the card.
 
 
As an accent piece, I used the Egypt collage printed on ivory colored paper so that it would blend with the shipping tag. 


List of supplies:
Muse on the Nile stamp plate
Mica Chips
Gold Foil
Glitz paper pads
Tacky Glue & Glue Stick
Double-Sided Adhesive
Foam Dimensional Adhesive
Scor Pal
StazOn Ink Pad
Egypt Collage Image Sheet 
Yellow Tag Alphabet Collage Image Sheet
Shipping Tag 
 

www.alteredpages.com

Friday, June 26, 2015

Egyptian Art Cards

Happy Friday, everyone! 

In the last 10 years or so I have really come to appreciate the beauty of Egyptian art and the grandeur of this ancient civilization.  There is much debate about how the actual builders of the pyramids lived, but there is no doubt at all about its historical significance.  My project today for Altered Pages is an homage to the Pharaohs.

For a close-up of each of the cards in this project, please hop over to the Altered Pages Artsociates blog.


Side one started as a full-page collage


Side two are separate pieces of art
 
Stop by again soon and see what I've been up to.  I've got some projects in the works that I'm pretty excited about!  Until then...Happy Crafting!!!!
 

Friday, April 24, 2015

Dragonfly art

 
Welcome to my blog.  Today I have a summery canvas project share with you.  The full project can also be seen on the Altered Pages Artsociates blog.

Check out How to Make a Sunset Dragonfly Canvas by Robin Horasanian on Snapguide.

A special thanks to Louise Stailley who made the beautiful paint skins for me!! 

If you have the time, take a look around and see some of the other projects I have to share with you.  I hope you'll visit again.  HAPPY FRIDAY!!

Friday, March 27, 2015

Cards, cards, cards

Do you like to make collage art?  You need to check out the thousands of images for collaging at Altered Pages!  I love the collages.  No matter what your style, there is a collage sheet for you just waiting to be made into art.  I have a box full of single images, which are the pictures leftover from other projects.  I grabbed my box and started mixing and matching and adding in some German Scrap and other embellishments.  Backed with some of my stash of scrapbook paper and a stamp or two and these are the results. Hop over to Altered Pages Artsociates if you want more info on the images used.   I hope you like them.


Until next time, have a great day, friends!

Wednesday, March 18, 2015

Undersea Dreams

Hi everyone!  Guess what??  Today is my birthday and I wanted to share my post over at Altered Pages Artsociates today.  It's a card that I've been working on for quite some time.  Last summer I started this project by taking a beautiful mermaid image from the Mailbox Muse collage sheet and blending it into a larger background with distress paints and a background stamp. 

When that was done, I thought, "Now what?"  I didn't have an answer so I put it into the box on my desk for art-in-progress.  I take it out every once in a while and try different things, but now I've finally finished it. 
 

I had the perfect stamp to finish this all along and it came in the same kit as the image!  The Mermaid Fantasy Mailbox Muse kit has a great set of stamps including an one of seaweed.  I masked off a border at the bottom and stamped a row of seaweed in permanent black ink.  I stamped the seaweed again on the envelope along with the adorable seashell from the same stamp set.

I wanted the seaweed to stay in the foreground so I opted for paint instead of markers because it was stamped over paint and metallic ink circles.  I used flat, metallic and Art Anthology dimensional paint for the fronds.  I roughly followed the rubber stamp with a detailed brush.
 
 
 I love using German Scrap on my cards.  There are many designs and it is a great way to add a little dimension and a little shine without overwhelming the artwork.  On this card I chose a border piece from one of my favorite designs in my collection.  The bottom border helps blend the card and the painted seaweed.  I added an identical border at the top for balance.  Then I trimmed a few tiny flowers off another piece of German Scrap.  A few were glued right to the card and a few were attached with bits of foam tape.
 
 
I added words from two different stamp sets.  The mermaids came with 'UNDERSEA FANTASY" and Altered Pages also has a Dragonfly Dreams stamp set with a lovely script "dreams" so I combined the two and came up with "UNDERSEA dreams", which is stamped in gold ink.
 
I colored the envelope with permanent markers so that if it has to be delivered on a rainy day, it won't bleed or wash off.  There are a few other pictures over at the Altered Pages blog if you want to see the steps along the way.  I hope you'll pop over there anyway and check out the other projects this month using Kunze German Scrap.  I just know you'll enjoy them.
 
 
Now it's ready to be sent off into the world.  I love making cards and sharing fun mail.  Thanks for stopping by.  Until next time...Happy Crafting!