Pages

Friday, March 11, 2016

Muse on the Nile

Marhaban!  That's how you say hello or welcome in Egypt.
 
My post today, which is also featured on the Altered Pages Artsociates blog, is two greeting cards and a tag using the wonderful Muse On The Nile stamp plate and the Egypt collage sheet.  I've also got an altered tag as a little bonus.
 
 
The first card I made has King Tut's face and the pyramids stamped on thin mica chips with StazOn ink.  When you stamp on mica be sure to use a steady hand because rubber stamps may slide a little if you aren't careful.  It's a little like stamping on plastic.  Notice how dark the mica started out?  It's a rock that is formed of paper thin layers.  You can pull them apart to get the color you desire.  The pieces were attached with a glue stick.  Don't worry, you can't see the glue.
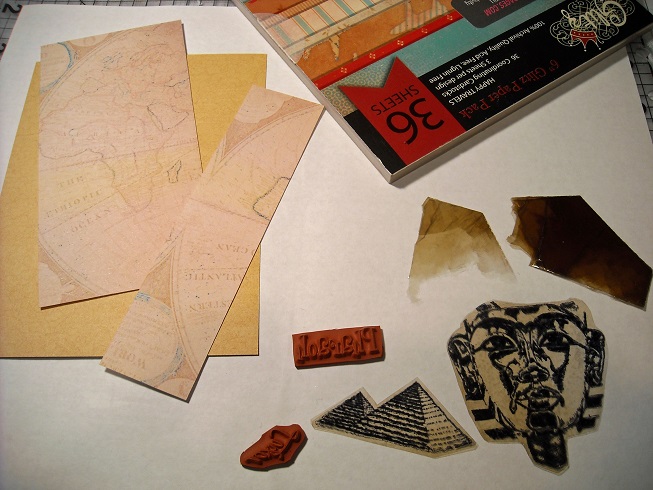


There is a globe pattern in the Happy Travels paper collection from Glitz.  I trimmed it down so keep the side with Egypt and set aside the other piece for a project later on.  The yellow background is from a Graphic 45 paper pad and has a very faint crackle pattern that isn't really visible here.  I thought it went well with the ancient theme.  Once the mica was glued in place I stamped the words from the stamp plate around the images.  The words in black squares were cut from the Egypt collage sheet.
 
 
Do you like the shiny bling?  I had a scrap of gold foil from another project.  I set the metal sheet on a mouse pad and used the tip of my ScorPal stylus to create this random pattern.  Then I cut a random shape from the piece and glued it in place with tacky glue.  I paired it with a gold glitter layer so that the gold metal wouldn't be overpowering for the rest of the card if it was the only shiny element.
 
 
I thought this chevron paper made a great background for an Egyptian card!  It hints at a pyramid, doesn't it?  I bought a sheet of the Egyptian collage on parchment from Altered Pages so the Pharaoh had a vague yellow tint and a blue/black design and it paired beautifully with this Glitz design.  The paper pad also had a solid dusky blue sheet and I stamped the pyramids on it to match the background.  Foam dimension squares hold the pyramids a little off the card.
 
 
As an accent piece, I used the Egypt collage printed on ivory colored paper so that it would blend with the shipping tag. 


List of supplies:
Muse on the Nile stamp plate
Mica Chips
Gold Foil
Glitz paper pads
Tacky Glue & Glue Stick
Double-Sided Adhesive
Foam Dimensional Adhesive
Scor Pal
StazOn Ink Pad
Egypt Collage Image Sheet 
Yellow Tag Alphabet Collage Image Sheet
Shipping Tag 
 

www.alteredpages.com

Friday, February 26, 2016

Serving up dragon, three ways

Hi everyone!  I've got a trio of dragon pieces to share with you today.  This month Altered Pages has partnered with Faerie Song Art Stamps and the design team has been sharing some great fantasy artwork with you.


I used two very fun dragon stamps from Faerie Song Art Stamps to create a clean-and-simple greeting card, a tag and an ATC. 


There were supposed to be "in progress" photos to share but my computer was mimicking a hungry dragon and ate my camera's memory card!  Here are the completed pieces. I hope you like them.  There is a list of supplies at the bottom of this post.


Greeting card
The dragon on this card was colored with watercolor pencils and a water pen.

Artist Trading Card (ATC)
The map on this ATC is a scrap leftover from another project.  I find ATCs the perfect way to use up random scraps because of their small size.

Altered Tag
It's a shame that the scan can't show you the shine of the dragons on this tag.  The mica in the watercolors is so beautiful.  And the shiny mica chip, Dew Drops and a rhinestone sticker all compliment the dragons very well.


I hope you enjoyed the art I've shared here today.  Stop by tomorrow for more projects and inspiration!

Supplies:
Glitz papers
Tag
Watercolor paint
Watercolor pencils
Waterbrush
Black pigment ink (with clear embossing powder)
Gelatos
Mica chips
Dew Drops
Rhinestone
German Scrap
Double-sided adhesive
Glue stick & Tacky glue
ScorPal
Assorted fibers

Collages:
Ancient Map
Ahoy Matey
Vintage Paper
Color ATC Yellow


Wednesday, February 24, 2016

Do not meddle in the affairs of DRAGONS

I know Valentine's Day has come and gone but I completely forgot to share this on my own blog.  Today I have a different kind of Valentine to share.  This poor brave knight wishes to give his love a rose for Valentine's Day, but a dragon has other ideas.

Altered Pages is partnered this month with Faerie Songs Art Stamps and I have two fabulous dragon stamps to play with.  "Puff" and "Do Not Meddle" are featured here on the card.


I began by using Art Anthology paint on a piece of card stock.  I brushed and tamped the paint onto the paper so that there was a random pattern.  Then I used pigment ink to stamp the dragon and used clear embossing powder to set the ink.  The paint gave him a wonderful color and shine! 


After cutting him off of his cloud, a white Uniball gel pen was used to highlight his eyes and teeth.  Maya Mist paint was sprayed into a paint palette and thin brush was used to paint over his ridged back.  The Maya Mist is shiny and worked well over the other paint.


Scrapbook paper and collage images make up the rest of this Medieval Valentine.  The list is below in the supplies.


Will our brave hero win the heart of the fair damsel?  You and your Valentine decide!!! 


Supplies used:
Dragon stamps by Faerie Song Art Stamps
Acrylic stamping block
Mists of Avalon collage sheet
Celestial Wonders collage sheet
Mini Images Valentine collage sheet
Unchartered Waters Glitz 8x8 paper pad
Art Anthology paint
Maya Mist paint
Uniball white gel pen
Black card stock
Scor Pal
Glue stick & double sided tape

Friday, January 22, 2016

Mixed Media Vanetine Heart

Hi everyone! I'm here today with a mixed media project, which is being featured today on the Altered Pages Artsociates blog.  I used a pressboard heart and created a decoration for the mantle.


Pressed wood is thirsty so I coated the heart with gesso before painting.  The gesso makes a nice base coat so that your paint goes on evenly and the color stays true.  After the base was completely dry, I squirted on three different colors/types of red paint.  One of the paints was glossy just to give the piece a little more texture and interest.  Then, instead of using a brush, I brayered the entire surface, which created wonderful lines and patterns.

And now the fun began!  I started by choosing the Queen of Hearts collage sheet and cut out one of the little beauties.  She is backed with a German scrap spiky flower and also sports a German scrap crown.  Black lace made a nice background to highlight the game tiles.  

This wooden heart will be free-standing with on a plate rack, but it could just as easily be turned into a wall hanging by adding a loop of ribbon  glued to the back.


Thanks for visiting today!  This project and many more can be found on the Altered Pages blog just by clicking HERE.

www.alteredpages.com
Visit Altered Pages.com for your art supply needs!
Supplies used on the mixed media heart:
Gesso
Brayer
Tacky Glue
Ribbon, lace and flowers (cut apart)
German scrap
Game tiles
Glitz giant rhinestone stickers
Dew Drops
Bazzill paper flowers
Collage images
   Queen of Hearts
   Valentine Faux Postage
   Mini Images Valentine


Friday, January 8, 2016

A little vintage Valentine's Day romance

Winter is in full swing here in the US and as the joyful December Christmas and other holiday decorations are coming down it's time to look ahead.  Valentine's Day is right around the corner and love is in the air over at Altered Pages!  Today I have a card to share that will be sure to please your honey.


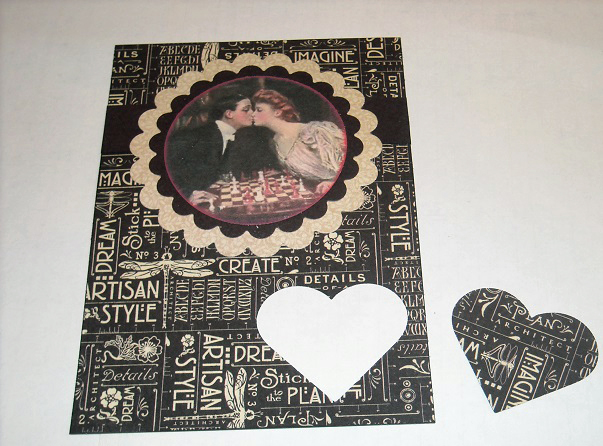
The color scheme makes this card suitable for a man or a woman and is super easy to make.  Start with the Young Lovers collage and punch or cut out the kissing couple into a circle shape.  I have a scalloped die set, but concentric circles would be just as pretty for the matting.  Ink the edges of your picture to soften the edges a little.


The card elements were made from three sheets of the Graphic 45 Artisan Style paper pad.  These papers are two sided and contain the same two colors on each sheet so they coordinate perfectly with one another.  A heart was cut out of the main panel, allowing the bottom layer of cardstock to show through.  (And leaving me a beautiful embellishment to use on another card!)


The tan floral paper used for the bottom circle layer was also used to stamp the Mailbox Muse dragonfly, which was cut out and mounted at the edge of the heart-shaped hole.  Three black gems give the card a touch of sparkle.  There is still plenty of room to write or stamp an "I love you" inside the heart.


Now, you just need to plan the rest of your romantic evening...

Thanks so much for stopping by.  I hope you'll come back again real soon.  Until then...Happy Crafting!

Products used:
Graphic 45 Artisan Style 6x6 paper pad
Young Lovers 2
Mailbox Muse Dragonfly stamp set
Glue stick or adhesive tape
Score Pal


Monday, December 28, 2015

Christmas gifts

I made a few canvases for friends this year for Christmas.  Here are the highlights:


Until next time...HAPPY CRAFTING!

Friday, December 25, 2015

Potted Flowers

Hello and Merry Christmas

The project I am sharing with you today is a "vase" for your holiday table.  It can be used as is for artificial flowers or with a glass cup or bottle inside to hold water if you prefer real cut flowers.


I started with a large aluminum can from beef stew.  I wanted a container large enough to hold a full glass or small vase of water.  Using the Activa Rigid Wrap, I cut a long strip to go all the way around the can from top to bottom on two sides.  This starter strip gave all of the other pieces something solid to adhere to.


The Rigid Wrap is super easy to use.  Simply dip the strips into water and press into place.  Gently rub each piece, adding a drop of water to your finger when necessary, until the clay smoothes out and the canvas backing doesn't show.  At this early stage you can still see the lines of the can through the wrap.

I started adding squares and strips in various directions to build up the texture and hide the can's lines.  When I was happy with the patterns and textures I set the can aside to dry.  I left it about 24 hours.


When dry, I painted the can with a shiny bronze acrylic paint...then a little more drying time. 


Afterwards, I rubbed Chocolate Gelato on the ridges and bumps to give it a little aged look.  Green StazOn in was sponged on top for a little holiday color. 


At this point I should have sprayed it with a fixative, but I didn't.  I know this, because when I went on to the next step some of the green bled through!  Oops!

Anyway, I used some of the ribbon I received in an Altered Pages kit (this year's Christmas kit...I think) and plucked out the gold Dew Drops from the Golden Berry set.

I wrapped strips of double sided adhesive tape at the top and bottom and pressed the ribbon in place.  Then I glued the Dew Drops in place with Jewel-It glue.  This is where my mistake became apparent.  Everywhere the glue soaked into the ribbon there is a green tint.


To make this project more festive, I added an Altered Pages collage image of Vintage Santa Claus and a Christmas wreath, attached with Tacky Glue.


I opted for artificial flowers because my dining room doesn't get enough natural light to keep real flowers alive for very long. 


Best wishes to everyone for a happy holiday!  Please stop by the Altered Pages Artsociates blog to see another fun project using Activa products.


Until next time...HAPPY CRAFTING!