Pages

Showing posts with label Art Papers Online. Show all posts

Sunday, June 8, 2014

ICAD Week One

So, it's the end of the first week of the Index-Card-A-Day challenge and I am proud of myself for completing one card each day!  I created most of these on my lunch hour sitting in my car with the windows down and the radio on.  I have an on-the-go art kit in my car just for this challenge.  It's a nice relaxing break in the middle of the day.  The photo I shared of my on-the-go kit last week is kept in my purse.  I expanded it a little bit for the car.  I'll try to get a photo of it this week for you.

I'm working on some areas of my art that I am less comfortable with, such as drawing my own pictures and lettering.  I am so used to rubber stamping that I haven't spent a lot of time doing things by hand.  I chose to follow the suggested theme daily prompts.  There is an overall weekly prompt as well, but I used mostly my own writing instead of cutting them out of magazines, etc.

http://daisyyellowart.com/icad/icad-faq.html
Week One was cut out phrases, etc.
http://daisyyellowart.com/icad/icad-faq.html
Daily Prompts


Here is what I did this week...

Prism
Circus Tent
My Name Is...
Puzzle
Galaxy
Nail Polish
www.alteredpages.com
Yellow (Images from Altered Pages)
I also had a road trip this weekend.  I went to the annual warehouse sale at US Art Quest / Art Papers Online.  So much goodness in one place!!  There was an entire room of sale items and full-priced items were 25% off.  Super fun to wander the aisles and see all the wonderful art supplies and gorgeous papers.  Here is just a sampling of what I picked up...
Over 50 sheets of 2' x 4' paper
Art Supplies on top of my big box of paper!
Perfect Paper Adhesive, 101 Heavy Molding Paste, Matte Finish spray
Mica flakes and hand made paper packs
Rubber stamps (new and used), Mica tiles, wire and an awesome metal tin with see-through lid
Thanks for stopping by!  Until next time, have a wonderful week and Happy Crafting!!

Tuesday, April 22, 2014

MOO Art Greeting Card


Hello friends!  It’s Trending Tuesday over at the Altered Pages Artsociates blog.  Every month a different crafty trend is highlighted and the whole team joins in the fun!  We are teaming with Unruly PaperArts and Leaky Shed Studio in April to bring you some fun projects with … MOOs. 

A MOO is a small piece of art that can either stand alone or be part of a larger project.  The monthly theme over at Unruly PaperArts is “Mail Art and MOOs” so I’ve incorporated mine into a greeting card with (faux) postage today.

I found this wonderful cream colored paper from Art Papers Online.  Textured paper is a great way to add some dimension and interest to a card project.  Several layers of the three Colorbox chalk inks shown were added to it.  These are the only inks used throughout the project.  I started by simply rubbing the stamp pad over the ridges.  Then I used sponges to add more layers.  Finally, I dipped the edges in the dark brown ink pad to give it a defined edge.

Because my theme for this card was “Paris” I chose to use the rubber stamp set from Altered Pages’ sister company, The Mailbox Muse.  These wonderful red rubber stamps were part of the All Things French kit.  The butterscotch ink was sponged onto a sheet of cream card stock and then stamped with three stamps - “evening in” “Paris” and the Eiffel Tower in the dark brown.

Two collage sheets of faux postage from Altered Pages were used for the images on the MOOs.  I was so excited to have a reason to use my patterned scissors!  Using the postage stamp edged pair I cut out several of the more colorful images that I thought would blend well with my color scheme.  I brushed the edges with butterscotch ink to highlight the fancy cut. Each MOO is 1 1/8” by 2 3/4” and two images fit perfectly on each one.  They were adhered with an Elmer's X-treme glue stick and then I trimmed the excess and inked the edges.  A wide band of burnt sienna went around each of the MOOs and then a thinner band of dark brown on top.  After dipping each side into the brown ink pad, a Fleur de Lis brad was added to one on the corner to balance the flower attached to the other side of the finished card.

I smooshed the Leaky Shed Studios crown down onto the dark brown ink pad so that it would have an even coating of ink.  Once it was glued onto the card three tiny Prills by US ArtQuest were added to it over the laser engraved pattern.

Everything was adhered to the textured paper using Helmar 450 Quick Dry glue.  I went with liquid glue because the paper is extremely bumpy.  I wanted to be sure the images stuck well.  I admit that I did weight the whole thing down with a sheet of bubble wrap and a heavy book…just to be sure!
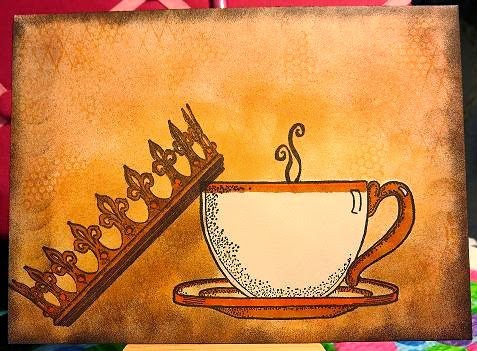
And what would mail art be without an envelope?  The space for the receiver's name is reserved by using my favorite (retired) tea cup image from Auntie Amy.  Then I stamped the Stampendous! crown at an angle and added a little Stampin' Up steam.  Both images were colored with Bic Mark-Its permanent markers.  After masking the cup, the same three Colorbox chalk inks are sponged around the cup and the rest of the envelope.  Two textured stamps inked with the butterscotch ink were added at random to give it a little texture.

Be sure and come back on Friday for my next design team post!  Happy crafting!

Supplies:
Art Faux Postage collage sheet
Paris red rubber stamp set
Fiskars Postage pattern scissors
Brown flower – Michael’s dollar bin
Tea Cup stamp from Auntie Amy
Crown stamp by Stampendous!
Steam stamp from Stampin' Up
Mini Circle texture stamp from Sin City Stamps
Diamond Grid stamp by Stamp Camp
Oriental Trading Company Fleur de Lis brad
Colorbox Chalk ink – butterscotch, burnt sienna, dark brown

Wednesday, December 18, 2013

Christmas greetings!  I can't believe how long it has been since my last blog post.  Between dealing with some health issues and working long hours the days have just flown by.  I've done a little bit of crafting since then so I've got a few projects to share.  The first one is a postcard swap hosted by Art Papers Online.  I'll have another ready to share in a couple of days.

There are 60 crafters and artists in this swap and we all started with a packet of 10 handmade Thai postcards.  Each of us will send 9 cards off into the world this month to welcome in the new year with pretty mail.  The first card I made was the stamped American Eagle design.  I like the picture I came up with but I wanted something "different" for them so I switched over to napkin collage.  I used US Art Quest's Perfect Paper Adhesive (PPA) matte finish on all of them.  Some of the cards have fairy dust glitter on them but for some reason it doesn't show on the scans.

Since I only need 9 of the 10 for the swap one of these will be left out.  I haven't decided yet which one that will be.  So without further adieu, here are my cards for the swap!
I know which one is my favorite and I'd like to know which one is yours!  Drop me a line and let me know if you like them...and if you do, which one you like best. And you can check out everyone else's postcards on this Pinterest board:  http://www.pinterest.com/artpapersonline/art-postcard-swap/

Until next time...Happy Stamping!