Pages

Tuesday, April 22, 2014

MOO Art Greeting Card


Hello friends!  It’s Trending Tuesday over at the Altered Pages Artsociates blog.  Every month a different crafty trend is highlighted and the whole team joins in the fun!  We are teaming with Unruly PaperArts and Leaky Shed Studio in April to bring you some fun projects with … MOOs. 

A MOO is a small piece of art that can either stand alone or be part of a larger project.  The monthly theme over at Unruly PaperArts is “Mail Art and MOOs” so I’ve incorporated mine into a greeting card with (faux) postage today.

I found this wonderful cream colored paper from Art Papers Online.  Textured paper is a great way to add some dimension and interest to a card project.  Several layers of the three Colorbox chalk inks shown were added to it.  These are the only inks used throughout the project.  I started by simply rubbing the stamp pad over the ridges.  Then I used sponges to add more layers.  Finally, I dipped the edges in the dark brown ink pad to give it a defined edge.

Because my theme for this card was “Paris” I chose to use the rubber stamp set from Altered Pages’ sister company, The Mailbox Muse.  These wonderful red rubber stamps were part of the All Things French kit.  The butterscotch ink was sponged onto a sheet of cream card stock and then stamped with three stamps - “evening in” “Paris” and the Eiffel Tower in the dark brown.

Two collage sheets of faux postage from Altered Pages were used for the images on the MOOs.  I was so excited to have a reason to use my patterned scissors!  Using the postage stamp edged pair I cut out several of the more colorful images that I thought would blend well with my color scheme.  I brushed the edges with butterscotch ink to highlight the fancy cut. Each MOO is 1 1/8” by 2 3/4” and two images fit perfectly on each one.  They were adhered with an Elmer's X-treme glue stick and then I trimmed the excess and inked the edges.  A wide band of burnt sienna went around each of the MOOs and then a thinner band of dark brown on top.  After dipping each side into the brown ink pad, a Fleur de Lis brad was added to one on the corner to balance the flower attached to the other side of the finished card.

I smooshed the Leaky Shed Studios crown down onto the dark brown ink pad so that it would have an even coating of ink.  Once it was glued onto the card three tiny Prills by US ArtQuest were added to it over the laser engraved pattern.

Everything was adhered to the textured paper using Helmar 450 Quick Dry glue.  I went with liquid glue because the paper is extremely bumpy.  I wanted to be sure the images stuck well.  I admit that I did weight the whole thing down with a sheet of bubble wrap and a heavy book…just to be sure!
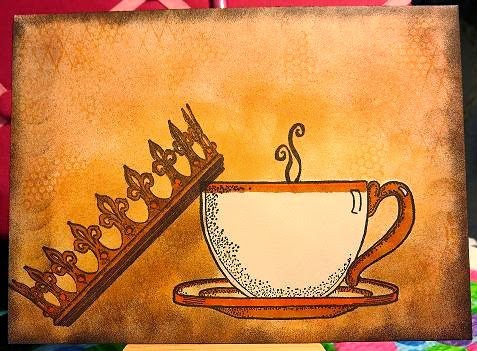
And what would mail art be without an envelope?  The space for the receiver's name is reserved by using my favorite (retired) tea cup image from Auntie Amy.  Then I stamped the Stampendous! crown at an angle and added a little Stampin' Up steam.  Both images were colored with Bic Mark-Its permanent markers.  After masking the cup, the same three Colorbox chalk inks are sponged around the cup and the rest of the envelope.  Two textured stamps inked with the butterscotch ink were added at random to give it a little texture.

Be sure and come back on Friday for my next design team post!  Happy crafting!

Supplies:
Art Faux Postage collage sheet
Paris red rubber stamp set
Fiskars Postage pattern scissors
Brown flower – Michael’s dollar bin
Tea Cup stamp from Auntie Amy
Crown stamp by Stampendous!
Steam stamp from Stampin' Up
Mini Circle texture stamp from Sin City Stamps
Diamond Grid stamp by Stamp Camp
Oriental Trading Company Fleur de Lis brad
Colorbox Chalk ink – butterscotch, burnt sienna, dark brown

Friday, April 11, 2014

Mail Art - an all-in-one card


Hello and welcome to my first post as part of the Altered Pages design team!  I appreciate the opportunity to share my art with you!  This month, Altered Pages is teaming up with Unruly Paper Arts, which is a BlogZine with wonderful art, and Leaky Shed Studio products.  Their theme this month is Mail Art and Moos.  I had never heard of a MOO before.  We’ll get back to that.  First, let’s see my mail art project!

The Unruly Paper Arts April issue features an RAQ (ReaderArt Quest) challenge for their readers to play along and create using a theme and a visual prompt.  Teacups and Tiaras was the theme this month.  I made an all-in-one greeting card/envelope combo.

If you have an envelope template that would make an awesome starting point.  I don’t have one so I cut mine out by hand to measure 10” x 7 1/4”.  Using the paper in portrait format, score in 3/4” on each side, 2 1/2” up from the bottom and 3” down from the top.  Fold along all lines and then cut out the four rectangle pieces in the corners as shown.

To create the inside greeting panel I used a Prima stencil and Versa Mark ink to give the background some texture. 

While that was drying I started on the chipboard crown from Leaky Shed Studio.  These little crowns are beautiful and since they are laser cut some of them have intricate patterns.  I chose to gild the crown for this project so I chose a plain surface.  I brushed on a coat of US Art Quest Duo adhesive.  Once it was ready I brushed on the gold leaf by Gildenglitz.  It created a beautiful shiny gold finish.  I used a Leaky Shed teacup on this project, too.  It was painted with bright blue acrylic paint with a matte finish.  I wanted the only shiny thing on this project to be the crown!

I chose several images from Altered Pages collage images for both inside and outside of this project.  I’ve provided a list and links below for you. 

Finally, I knew I wanted a border at the top and while I was looking for one…I found three!  All of them again from my favorite Bazzill package.  (I’m starting to run out of these so I had better get some more!)  The swirly border was cut in half to use as steam for the teacup.  All four were inked with Dark Brown Colorbox Chalk Ink. 

Because the envelope is part of the card I thought a word of caution was warranted and wrote “Open Gently” across the flap. 

Now, what’s a MOO, right?  For anyone who doesn’t know, they are bigger than an inchie and smaller than an ATC.  They measure in approximately at 1 1/8” by 2 3/4”.  I think they make cute little pops of color and design.  Altered Pages has a page of MOO backgrounds or you can certainly make your own. 

Products used on these projects:
Leaky Shed teacup & saucer (not used in this project)
“Queen for a day!” rubber stamp by Where the Rubber Hits the Road (obsolete)
“Special Delivery” rub-on (company unknown)
Postage Stamp Outline rubber stamp (company unknown)
Red Rose tea string

Altered Pages collage images:
Lady with stole and hat – AP1401-Beautiful Blue
Lady with teacup – AP701-Vicorian Tea
Pansy group, flower & tea cups on MOOs – AP3032 Tea Party Flowers
Pansy (on tea tag) – AP1714-Blue Color Collage
MOO backgrounds – AP1638-Moo Backgrounds

Visit Unruly Paper Arts for additional inspiration.

Thanks for stopping by!  Until next time…Happy Crafting!

Sunday, April 6, 2014

Chinese Teacup Canvas

Hi everyone!  I want to share a project I did for a project for Altered Pages and Unruly Paper Arts.  The two have partnered in April to bring you inspiration this month.  My RAQ project is a 6x6 canvas board that I completed for the Unruly Paper Arts BlogZine.  RAQ stands for Reader Art Quest and is a monthly challenge open to all who follow them.  The theme this month is Teacups and Tiaras and there is a visual prompt to go with it.  Readers are encouraged to use the prompt in any way it inspires them and then to share their own projects on the Facebook feed.
I knew from first sight that I loved this dragon and that he was going to be on my project in some way.  I have a fondness for them anyway, but he is perfect for an Asian tea theme.
After painting the canvas pink, I used my Prima stencil with US Art Quest 101 Heavy molding paste.  I didn't want the shapes to be perfect so I kept the layer thin and did not fill every section of the stencil.

I chose my Altered Pages collage images and glued them onto card stock for a little strength.  Then I fussy cut out each one.  I distressed the edges of the Chinese poster.  Clear Stickles went onto the edges of the cup and saucer to bling it up since dragons are always drawn to shiny objects! The little embellishments (corners, mask & blue disk) came from Altered Pages.  My husband recently bought me the color kits as a birthday present.  The lace was in my Fringe and Fedoras kit from Mailbox Muse, which is a sister company to Altered Pages. 


Collage images used:
"Two Chinoiseries" and "Perfect Tea" - AP518-Tea Party
Dragon - AP334-Dragons
Tea Cup - AP3032-Tea Party Flowers
Rose - AP733-Flower Chromolithographs

Thanks for stopping by!  And check out my first OFFICIAL post as a member of the Altered Pages design team over on their blog on April 11th!!   I will be posting on the 2nd & 4th Friday each month.  You can see a different project from each team member every day!  So check back often.

Want to make my day?  Leave me a comment below.
Happy Crafting!

Tuesday, March 25, 2014

Collage Card

Greetings!  It's Trending Tuesday over at Altered Pages.  My project today is a collage card featuring a stenciled background.  You can see everyone's project here.

I used Ranger's Tim Holtz Distressed Paint to make random smears on the paper and then laid the Time Travel 12" stencil over the top and used black acrylic paint to sponge the clock image on top.  When the paint was dry, I took a wet paint brush and went over the blue to reactivate the paint.  For the most part it stayed in place but in some spots I got a nice faint tinge of blue over the star

Using my finger, I went in with metallic melon and blood orange Gelatos by Faber-Castell where there was no other color.  I chose those two colors to accent the rooster image that will be the focus of the card.  The sheet of images had a lot to choose from but this one just spoke to me.

Because I printed this little guy myself he is just on regular computer paper.  To give him some stability I glued him to a square of regular white card stock and cut him out along the image border. 

I added a smudge of the blue distress paint to the edges and at the bottom around his feet to help blend him with the background.  I noticed that the stencil packaging I had set aside to recycle matched the blue paint!  I cut both the main panel for the card and the smaller panel for the rooster out of the package.  Everything was layered on a black card base.

Altered Pages and The Robin's Nest have partnered in March.  The words were stamped on a scrap of The Robin's Nest paper that I used on a project last week.  (Yes, I admit that I haven't cleaned off my table since then.)  The words were backed with another piece of blue packaging.  Four black Diamond Drops were used to define the corners of the card and an old rooster button from my collection was the finishing touch to my collage.

Make my day and leave me a comment or follow along with me using the links on the right!  Until next time...happy crafting!


Wednesday, March 19, 2014

Spring is teasing us

Like most of us here in the northeast part of the country, I am ready for spring.  It's been a long, cold winter and I want to feel the warm breezes on my face again.  The temperature has been doing it's usual roller coaster ride - teasing us with 40s and then dipping back down to below freezing.  I want the pot holes filled and the flowers blooming.  My favorite thing about spring is having lunch in my car with the windows open and classical music on the radio.  It's a great stress reducer in the middle of the workday.  What's your favorite thing about spring?
Two-sided ATC - blue Dew Drops highlight the eggs in the nest.
Stay warm, my friends!  Spring is around the corner...and it's only two weeks until opening day!

Friday, March 14, 2014

Walk Like An Egyptian

I was browsing the Altered Pages collage collection recently and saw a wonderful page of Egyptian images (AP-137).  I love the pyramids & pharaohs.  It's the one type of documentary I will voluntarily watch on TV.  Absolutely fascinating, beautiful artwork in that ancient culture.

I cut out several of the images and tried out several different combinations until I found the one I liked best.  I cut the pyramid landscape scene in half so it can be seen on both sides of my card.

Since Altered pages is partnering with The Robin's Nest in March, I chose their dark distressed red scrapbook paper for the top layer and a textured dark green heavy card stock from my collection for the body of the card.  Once the images were attached to the scrapbook paper I stamped two obelisks on the same red paper and cut them out.  I used them to cover up some of the darkest background on the pharaoh image.  The word Egypt was stamped onto the landscape image. 

Then I needed some embellishments to give it a little life.  I used a clear Stickles glue on the yolk the pharaoh is wearing and chose some Robin's Nest chocolate Dew Drops.  And then I spotted this awesome border by Bazzill Half the Edge Cardstock Strips in a package of embellishments I also purchased at Altered Pages.  Doesn't this remind you of an ankh?  Perfect!  It was already a beautiful neutral color and worked well with the collage, but to give it a little texture I used two different shades of brown Crayola markers to make the dots.  The darkest green Mini Dew Drop from the hillside color collection went into each of the circles.  The Dew Drops were all adhered with 3D Crystal Lacquer.

I think it works as either a masculine or feminine card.  I hope you like it, too! And I always like to share a scan as well as a photo when my project is a card.  I think you notice different things in photos vs. scans.

Make my day and leave me a comment below or follow my blog with one of the links on the right side of the page.  Until next time...happy creating!

Friday, March 7, 2014

The end of another long work week

It's the weekend!  That wonderful time when we get to unwind from the long week of putting our noses to the grindstones and our shoulders to the wheels.  (sigh)  I'm ready for it!

I took one of those silly little Facebook quizzes to find out what kind of crafter I am.  It's a game right?  They couldn't possibly know me from 10 questions.  What did I get?  Niche crafter!  And I thought, "Darn it!  I'm trying to break out of my little box!"  Think I'm taking that little quiz seriously now?  Yep!  So this weekend is going to be spent on new-to-me projects.  Yes, I will probably make a card or two as well, but I'm going to try to keep it all new and different. 

I had a new experience this week.  I went to my first class at Painting With A Twist.  So much fun!  I've been thinking about going for a little over a month and when I saw that they had a class on painting the TARDIS I couldn't resist any longer.  One more Doctor Who art project added to my collection.  Did you notice that the windows are wrong?  I was so caught up in the class and trying to do as Jackie suggested that I didn't realize she told us the wrong shape on the windows.  I can go back for their SOS day, but I think I'll try to fix it at home first.  Heaven knows, I have plenty of paint!

For the first time, I also decided to frame one of my art journal pages.  Surprisingly, there is none of my original art on the walls in my own studio!  I've decided that should change.  I like this pretty floral and decided not to keep it buried in a book.  Plus, my craft room is pink and green so how could I resist?  I was thinking a square of pink Dew Drops around the glass and leaving the rest white.  What do you think?  Keep it white or paint it pink before I start adding the bling? 

And now, before I log off to go and get painty I will leave you with this joke.  It's an old one but it still makes me laugh.  Enjoy...


This "warning" was forwarded to me by a friend.

A recent study indicated that rubber stamps and embossing powders give off certain pheromones that actually hypnotize women and cause them to purchase unreasonable amounts.  When stored in large quantities in enclosed paces, the pheromones (Rubber) cause memory loss and induce the nesting syndrome (similar to the one squirrels have before the onset of winter i.e. storing food), therefore perpetuating their species.  Sound tests have also revealed that the rubber emits a very high pitched sound, heard only by a select few: a breed of women known as "Rubber Stampers". When played backwards on an LP, the sounds are heard as chants, “buy me, stamp me, emboss me."

Studies have also indicated that aliens have inhabited the earth, helping to spread the effects that these Stamps have on the human population.  It's also been experienced that these same pheromones cause a pathological need to hide these Stamp purchases when taken home (or at least blend them into the existing stash), and when asked by a significant other if the stamp is new, the reply is: "I've had it for a while."
 
Have a wonderful weekend!  Drop me a note in the comments below and make my day!