Pages

Friday, February 22, 2013

Retirement Party Memory Box

A friend and co-worker is retiring next week.  She is over-the-moon excited to start the next leg of her journey as she joins her husband, who is already enjoying his own retirement.  A few of the girls wanted to do something special for her party.  We've all seen this idea all over Pinterest, but here is my offering for a memory box.

A sturdy cardboard box and napkin collage supplies
I chose a box with a flap so I collaged the entire thing even though it will be tucked inside.
I cut a hole large enough to easily insert 4x6 cards at the start of the project, then added my collage pieces.
Card choices are: Bon Voyage, Memories, & Best Wishes.  I just need to decide if I'm going to decorate them with more stamps.  I got out a dragonfly stamp, but I haven't decided yet.
I made a little panel to cover the hole.  It is embellished with a chipboard dragonfly and Dew Drops.
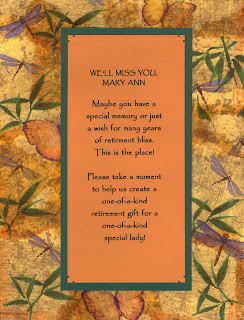
New piece added 2/24 - sign made to encourage party-goers to drop a note in the box.
One last piece to pull everything together.  A card to complete the set.

So there it is.  I hope she enjoys reading all of the notes her friends & co-workers leave at her party.  Drop me a line and let me know what you think or just say hello! There is a link at the bottom of the page if you'd like to follow my blog.  Until next time...Happy Stamping!

Monday, February 18, 2013

New Project Takes Me Out Of My Comfort Zone

I recently joined a new online crafting group called Creating the Crafty Life.  When I started my journey to try new things and grow I knew that finding a new group of friends with widely varying tastes and styles would help me stretch in a supportive environment.  I joined a couple of online classes.  On Tuesdays, I attend the Helmar tutorial and Terri Sproul's mixed media technique classes.  I've also been enjoying the Saturday Crafts Fair with so many different classes!  But I've mainly been an observer.  This week, I signed up for my first mixed media swap.  I chose a project that is nothing like anything I've ever done before.  The challenge was to create one canvas in a Shabby Chic theme.  Exciting ... and terrifying!  I mean, what if I couldn't pull it off?!  I've never done a canvas before and I had to Google "shabby chic" to even figure out some basic guidelines. 

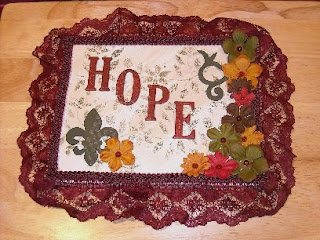
I lightly brushed beige acrylic paint over the white canvas and a floral background was very lightly sponged over the beige.  I was hoping for an aged, distressed look.  One of the bullet points for shabby chic, says Google.

I've never altered chipboard die-cuts before.  The letters started out with shiny designs.  I used an emery board to sand them a little, then painted them with barn red acrylic paint.  When that was completely dry, I used my brayer to evenly coat my crinkle background stamp to make them seem aged.  The Fleur de Lis die-cut started out plain cardboard.  I used USArtQuest's 101 Light and a checkerboard stencil to give it a little texture.  I painted that in yew green matte acrylic paint and then lightly sanded over the tops of the checkerboard with my trusty emery board to allow some of the white to show through.  The vine chipboard was simply painted yew green.  I left it solid rather than altering it further.


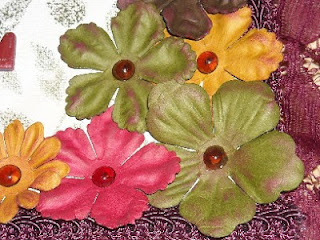
The flowers were part of a scrapbooking kit I received as a gift years ago.  I sponged on dark red ink to give them a little interest and to help bring the red lace into the design in a different way.  The Robin's Nest Dew Drops were added for the flower centers.
I've never trimmed anything in lace before and this canvas has two different types.  The wide lace is a single piece glued all the way around the canvas using Helmar's 450 Quick Drying Adhesive.  The thicker but narrow ribbon is 4 pieces glued on top of that to hide the edge.

So there it is!  My very first mixed media piece!!  I'm very proud of it and very proud of myself for tackling something new.  I hope you like it!

Supplies Used:
Pretreated Canvas from JoAnn Fabrics
Acrylic Paints
USArtQuest 101 Light Artist's Cement
The Robin's Nest Dew Drops (different color than pictured below)
Stencils
Chipboard Shapes
Paper Flowers
Lace

Drop me a note sometime!  There's even a link at the bottom of the page if you'd like to follow my blog.  Until next time...Happy Stamping!

Sunday, February 10, 2013

Which stamp do you own and consider most versatile?

Do you have a stamp that you like to use over and over, regardless of the reason behind your project?  One that works equally well for birthdays, holidays, get well, thinking of you, etc?  For me, it's Griz from Stamps By Judith.  She makes more than one pose of him, but the original standing version is my favorite.  In fact, when I went to my LSS crafter's yard sale I almost bought him again.  I mean, he was only $2 and he was in pristine condition.  That's what got me thinking about him.  I don't understand how you can have that stamp in your collection and still have him be that clean and perfect?!   And then decide you don't want him??  That's crazy!

He is fun because he can wear hats.  Does that sound silly?  I feel silly saying it but that's the truth.  I love him because all you have to do to change his personality is change his hat and whatever he is holding in his big clumsy bear paws.  He works for both men and women...how great is that?  If I'm ever stuck for a "guy card" I just bring him back out.  In the end, I didn't buy him again.  That was a week ago and I'm still having twinges of regret.  No, there is nothing wrong with my Griz, but he was just so beautiful and new! 

Here, see for yourself how wonderfully versatile he is.  I've made over 20 cards with him.  These are a few of my favorites.  Then take a moment to tell me about your favorite stamp in the comments.  I'd love to hear about it!


Saturday, February 9, 2013

Hubby's Valentine - shhh don't tell him it's posted

There are two holidays where I have trouble designing cards.  I'm always disappointed in my Valentine's Day and Easter cards.  Valentine's Day is romantic and my cards are usually cute and funny.  And Easter is a nightmare for me because I don't usually think in pastels.  I'll worry about Easter later.  Tonight I tackled hubby's Valentine. 

I've been trying to add more layers and textures to my cards so I knew I wanted to use my Cuttlebug in some way and I decided I would use die-cuts.  I have two different dies for similarly shaped flowers so I got them out to have a variety of sizes to choose from.  The design came to me when I saw the black & cream music note paper.

I cut out all of my flowers and placed them randomly on a sheet of card stock to determine the size card I wanted to make.  I settled on 5x7 so that most of my background stencil would show and I could use the largest flower without it being cramped.  For my stencils, I chose a swirly background that I sponged on in Vivid Garnet ink.  I added three random patches of checkerboard sponged in Vivid Cobblestone and a leaf pattern sponged on in Vivid black.  I glued down my flowers, added three different sizes of red gemstones using Helmar's Gemstone glue and stamped two sayings, "love" and "xoxo", which were also in Vivid Black ink. To pull the whole design together I sponged Vivid Garnet all along the outside edges of the paper and the tips of the flowers and then mounted the panel on black confetti paper. 

I like it.  It's got a lot of different layers while keeping to a minimal color scheme.  I'd love to know what you think!  Drop me a line sometime.

Materials used:
Textured heavy cream colored card stock
Black confetti card stock
Music note paper from DCWV's Heirloom Christmas Stack
Die-namics Layered Rose die cut
Tim Holtz Tattered Flowers die cut
3 stencils from my collection
Helmar's Gemstone Glue
6 mini, 3 medium & 1 large heart gemstones
"love" by Vap! scrap
"xoxo" found in the Target dollar bin
Vivid inks: Garnet, Cobblestone, Black