Pages

Showing posts with label canvas. Show all posts

Friday, September 14, 2018

A little mixed media

This week I have been playing around with color.  Fall is inching closer and Michigan will be a flood of reds and golds in a few short weeks.  I love Fall colors and that's what I've used on this canvas.


I started with a layer of gesso.   Right after the layer was complete, I dipped my brick stencil into the wet gesso to leave an impression.


To better show the texture of the dried gesso, I smeared on a few light spots of Gelato to highlight the ridges.


The entire canvas was covered with Dixie Belle's Grunge Glaze.  Since I was going with a Fall theme I felt like the brown in the glaze would be a good fit.


The glaze interacted with the Gelato and gave me some different undertones.  Gelatos are water soluable so they are activated with paint just as easily as with water.


I chose a few more Gelatos that reminded me of fall and used my finger to apply them in random spots on the canvas.


Now to add some fun texture!  Punchinella is a great way to add dots to a background.  You can sponge or paint over the surface.  This time, since I was using Gelatos I chose to lay down the ribbon and wipe over the top with a baby wipe to remove some of the pigment.  This lets the spots remain the same basic color as the surrounding area.


I made sure the ribbon was going in a couple of different directions so that the spots would be random.


At this point I sprayed the canvas with a fixative to keep the Gelatos from reactivating in the next stages.  The gesso was still out so I dipped a paper tube and a pencil eraser in it to add circles and spots.  Gesso is thick so these are slightly raised.


A little water was added to the grunge glaze to form drips.


Our paper towels at work have a gear on one end to go on the feeder.  There was an almost empty roll on the counter so I rescued this little piece of plastic and used it here to create these gear circles in the copper Art Alchemy paint.


I applied a few patches of a white pearl paint with my fingertip .  They look really white in the bright light at this angle.  At other angles you can barely see them.  I like that effect!


These letters are from a tag alphabet.  I have them just laid on the canvas right now because I am thinking of adding more layers to it.


Supplies Used:
Your choice of canvas or art journal
Gelatos in your favorite colors
Spray Fixative


Friday, March 24, 2017

Mixed Media Steampunk Canvas Board

Welcome to another March project being featured on the Altered Pages Artsociates blog.  Altered Pages and USArt Quest are partners this month and they are a perfect complement to each other.  Today I have a mixed media Steampunk canvas to share featuring products from both.  Please click here to see the full post. Here are some highlights.


Scan of project is below the list of supplies.
Supplies Used:
Art Canvas Board - 8x10, but they come in other sizes
Gesso, if desired
Chipboard Gears
Pink Paint Palette
6x6 Brick Stencil
Goosebumps Texture Spray
StazOn Ink Pads - spiced chai and emerald
Gelatos - cinnamon, iced chai, chocolate and green tea
Tacky Glue or other strong adhesive
Foam Adhesive Squares
Metal tin to hold bits and pieces
Fly With Steam Collage
USArt Quest 101 Heavy Artist Cement
USArt Quest PPA (Perfect Paper Adhesive) - matte
USArt Quest Perfect Pigments - tomato pearl, yellow ocher, burnt umber, metallic copper, wheat,  permanent green medium
USArt Quest Perfect Glaze
USArt Quest Prills - any color will do for this project because you are painting over them
USArt Quest Mica Flakes - cinnabar, copper and copper patina
USArt Quest Gilding Kit - includes Gildenglitz leafing, texture sponge & fuzzy ball to buff the metal to a shine and remove the little bits

Scan of project


Thursday, July 28, 2016

A Dixie Belle Canvas

Hello my artsy friends!  All month long the Altered Pages Design Team has been sharing projects using Dixie Belle paints.  There have been some really wonderful DIY and art projects. I think it's great that this paint works equally well for both.

Today I have a 5x7 canvas board to share.  I started with three base colors.  Dixie Belle Terra Cotta and Grunge Glaze and gesso for shading.


I used the palette to mix darker and lighter shades of the Terra Cotta paint and added it to the canvas board at random. To make areas even darker or lighter I used the glaze or gesso without mixing.


While the board was still wet, I used my fingers and my brush to get the last of each of the colors and drip them on to the canvas.  The board was thumped on the scrap paper to encourage the paint to drip the length of the board.  Then I turned it the other direction and repeated.


StazOn ink works very well over paint so I used three colors to make the bricks and darken the edges.  I lightly heated the ink with a heat tool without getting close just to be sure the ink was set enough to handle.  Then I used a white gel pen to outline the stenciled bricks by hand.  More ink was sponged in the top corner to give it some balance.


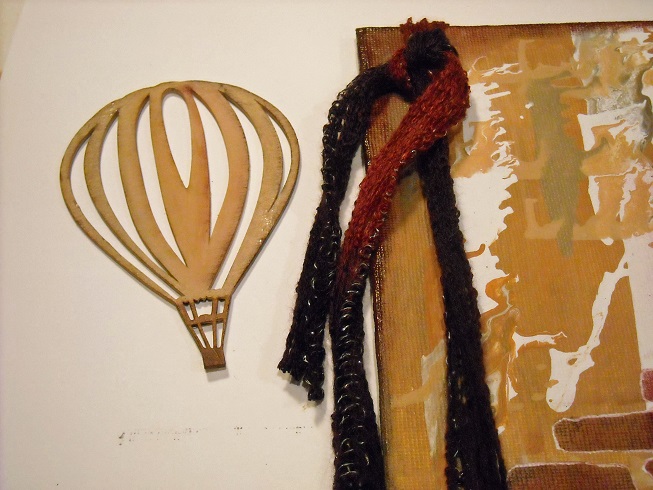
The lightened Terra Cotta paint coats this chipboard balloon.  StazOn ink was rubbed around the edged with a cotton swab and then the Grunge Glaze was added to the two outer stripes on each side.


One of the color tag alphabets made a great sentiment and a multi-color piece of ribbon finishes the piece.


Monday, December 28, 2015

Christmas gifts

I made a few canvases for friends this year for Christmas.  Here are the highlights:


Until next time...HAPPY CRAFTING!

Saturday, December 12, 2015

Here there be DRAGONS!

I love dragons.  I love the stories as well as the artwork that abounds around these winged wonders of old.  When I first found the Altered Pages website and saw the wonderful collage images that were available, DRAGON was one of my first searches.  I found this page and fell in love with this guy.  I've used him on another project last year.  He was featured on a gift box on that post.

This time, he is much, MUCH bigger!

But, I'm getting ahead of myself.  First I had to make the canvas to hold him.  For that, I chose an 8x10 canvas board and added layer after layer of Activa Rigid Wrap for texture.  It was very easy to apply!  And it's always fun to get in and work a project with your hands.  I stamped in a fine diamond shape while the plaster was still wet in a couple of places.  Because it was very wet from all of those layers, I set it off to the side to dry for about 24 hours. 


Then I added a layer of gesso and after that, I began to add color.  Art Anthology shamrock green is the base color.  It goes on smooth and has a light sheen to it.  When that was dry, I added pigment from my green, brown and gold Steampunk Gelatos.  The entire canvas board was sealed with a spray to prevent the Gelatos from smearing or rubbing off.  A touch of Irresistible spray was added for more texture.


Art Anthology green paint as the base color


With highlights


Dried - without color


Dried - with color
The dragon was resized in my print program to a full page size and printed on heavy card stock.  I applied Gelato pigment to my fingertip and then rubbed it on the image to avoid streaks.    I also chose a background that had a dragon image on it and cut them both out.


The images were glued down with gel medium and the coins, gears and tokens were attached with Tacky Glue.


I hope you like him as much as I do.  Thanks for stopping by.  Please come back again to see what other projects the Altered Pages Design Team has to share with and inspire you!


December giveaway at Altered Pages Artsociates


Until Next time, Happy Crafting!