Pages

Showing posts with label Altered Pages Artsociates. Show all posts

Friday, July 13, 2018

Fairy Dreams

It is no secret that one of the things I love best about Altered Pages is the large catalog of digital collage images.  They can be used as a single focal image on a project or combined in a seemingly infinite amount of ways.  This greeting card today uses images from several different collage sets to create a sweet floral fairy scene.


I picked out three of my favorite images and cut each one out in detail.  There was a lot of white in both the daisy and fairy images so I grabbed my craft knife and started by pruning the daisies.  When I was satisfied with my trimming I used glitter glue on the daisy centers.  I printed off a second image so that I could mount the center flower on foam dots.


I ended up leaving some of the white toward the bottom because there were other things going on.  I added a white flower border and pale yellow Dew Drops to the bottom.  I find that when you're making a scenery card, it helps your eye to rest when there is a bottom base.  Using a floral border helps create the image of the fairy dancing in the garden.

The words were also mounted with foam dots.  A few butterflies as playmates for the fairy and  I've got a fun little note card.  


Products Used:
Graphic 45 6x6 Home Sweet Home paper pad
Bazzill border
Dew Drops
Stickles
Adhesive tapes and glues

Collages Used:
Fairy Dolls
Fairy Dreams
Daisies
Pretty Purple


Friday, June 22, 2018

John Wayne...The Duke

All through the month of June Altered Pages is celebrating men.  The men in my family love to spend Sundays watching Westerns and there's no cowboy more manly than John Wayne, The Duke.  My card today on the Altered Pages Artsociates page is an homage to those rugged men in movie Westerns.  


I found a great black and white image of John Wayne (please don't ask me what movie it's from) in an old Mailbox Muse kit.  There were other Hollywood collages in that kit, which is where the words came from.  The other cowboy images were on the Old West and Vintage Cowboy sheets.  


The black bar border and white stars border gave me the old-time movie feel I was looking for.  I rounded out the design with two rubber stamps from the Muse Hollywood Movies stamp set.


Supplies Used:
Old West collage
Black ink (to edge the images)

And if you like cowboys, check out this kit!  There is only one left!!


Friday, April 27, 2018

I've got a notion ... a sewing notion, that is!

This old-fashioned sewing stamp set reminds me of the pajamas my grandmother used to make us when I was little.  Unfortunately, the "sewing gene" didn't make it to me!  I think she would have liked my trio of Artist Trading Cards (ATCs) that I'm sharing today over on the Altered Pages Artsociates blog.  I hope you can take a moment to hop over there and leave me a word or two and say hello!


Friday, January 26, 2018

Love is in the air

Love is in the air with Valentine's Day right around the corner.  This romantic couple can help you and your sweetie pie celebrate.


Three of the collage images on today's card are from the Victorian Valentines collage sheet from Altered Pages.  The sentiment image is from the Mini Images Valentines.  I think they all work really well together.  


I started with a red panel of card stock and a gold doily.  I made this one out of a textured gold card stock but any size and color you choose will work very well.  The doily is glued to the center of the card stock and then I layered on the images.  


The heart surrounding the couple in love has a dotted design around the edges.  Perfect for embellishing with a little Stickles glitter glue.  The smaller ornate heart has a ring of flowers around the heart and I added gold Stickles to the center of each little flower.


There is a lot of red going on here so I used some foam adhesive to hold the little plain heart off the page and make it stand out.  Two little strips of gold border stickers add another touch of glitz.


Aren't these little pearl petite flowers cute?  Just the perfect accent for my Valentine card.  The whole panel is mounted on an off-white piece of card stock.


Supplies used:
Victorian Valentines collage sheet
Mini Images Valentines collage sheet
Stickles - your choice of colors
Pearl Petite Classic flowers
Border Design 2 stickers
Adhesives - glue, double sided tape & foam tape


Friday, January 12, 2018

Valentine Salsa

Do you like making collage cards?  There are a lot of different types of collages, but my favorites are when I can take a bunch of unrelated images and make a scene with them.  When I was making this card I jokingly called it "Sally spices up a Tuesday night".  Yeah, I crack myself up.  If you'd like to see the individual collage images that went into making this romantic scene, click here.


Is it me, or does this guy from That's Class look like a young Kenneth Branaugh?


Friday, December 8, 2017

Ready to ring in the New Year

Today I have a tag that would be a lovely addition to that hostess gift you're taking with you on New Year's Eve.  Perfect for a gift package or hanging on a bottle of wine, this tag will let you ring in the New Year on a festive note.


My inspiration for this tag was the lovely lady in black and white.  I saw her on the Life in the 20s collage sheet and had to use the image.  Don't you just love flappers with all the fringe? 

I made an urban background with a brick stencil and two colors of ink.  I chose one of the clocks on the Time Travel stencil that is about to hit 12:00 midnight.  The bricks and clock are available at Altered Pages and they are two of my favorite stencils.  I added a cityscape with silver ink windows and then layered on some fancy lace and holiday collage images.  

Now...where's the party?


Supplies used:
Bricks stencil
Time Travel stencil
Ink
Lace & fibers
Tacky Glue (to hold down the lace)
Double-sided adhesive
Black rhinestone (for the clock center)

Collages:
Life in the 20s
Calendar Numbers 1-31
Dressed To Ring In the New Year


Friday, November 10, 2017

Retro Christmas Fun

Are you a traditional red-and-green Christmas fan or do you like to step out of the box and go non-traditional?  I have this fantastic paper pad called Fabulous by Authentique and it has a pink & turquoise pattern that reminds me of snowflakes, so I couldn't resist making a retro style Christmas card.


To see the details for putting this retro Christmas card together please visit my post over at the Altered Pages Artsociates blog.


Supplies Used:
Authentique Fabulous 6x6 paper pad
Celebration Trees collage sheet
Dresden Foil Pennant Point gold border
Chipboard snowflakes
Emerald Creek Metallic Mirror Gold embossing powder
Diamond Stickles
Typical card making supplies: scissors, adhesive tape, glue, etc.


Friday, October 13, 2017

Purrfect Halloween Wishes

Halloween is coming!  I love the costumes, decorations, whimsy and fun that this holiday brings.  My project this week is a cute Halloween card to get us into the spirit.


I recently got three new stencils from The Crafters Workshop and one of them is a pattern that reminded me of both flames and animal print.  Both of those things say Halloween to me so I decided to make a card with this great pattern by Carmen Medlin as the base design.


I used a piece of orange card stock with a shape cut out like a window.  If you don't have panels with windows already cut out, just grab your favorite basic shape die and cut one.  I sponged black dye ink onto the card stock. 


That's a great start.  I wanted to add a richer color to it so I added touches of red, green and yellow here and there.  Use your favorite blending tool, sponge or spouncer and just keep adding layers until you're happy.  I added green around all of the cut edges and then filled in.


Now for a focal point.  Altered Pages has many Halloween collages ranging from cute enough for toddlers to scary and macabre.  I chose one on the cuter side.  It's from the Halloween Memories sheet.  A Wink of Stella adds just the right touch of sparkle to the pumpkin's glowing face.


Since the image also has a black cat, I thought it was a wonderful chance to use my cat chipboard cutouts.  They are natural chipboard color so I sponged on black ink.  And every tasteful feline needs a collar!  This sheet of border stickers was purrfect.  One strip of the dotted pattern was all I needed to highlight the cat and the stripe on the card front.


A little black bling to balance out the top corner and this card is done and ready to be mailed.  A mail art treat for a friend!


Supplies Used:
Inks in your favorite colors
Blender tool (or spouncer)
Cat chipboard shapes
Border Design 2 stickers
Black bling
The Crafters Workshop stencil
Halloween collage sheet
Card making supplies: scissors, adhesive
A basic shape cutting die


Also posted at Altered Pages Artsociates art blog.  Click here to see the blog post.

Friday, August 12, 2016

Harvesting the Grape

Hello everyone!  If you ask parents of school aged children they might tell you that summer is almost over.  After all, school will be starting soon if your local district hasn't already begun.  As autumn draws closer, I think of the fall vegetable and fruit harvests.  It's my favorite season and I look forward to the fall colors and cooler temps.  I've tried to capture some of that in my card today.


The collage image is mounted on cardstock and attached with foam squares so that the card isn't just flat.  I added a few paper flowers and some Dew Drops in the same basic color scheme as the background.  There is still plenty of space to add a sentiment later...or not. 

If you would like to see the rest of the process, please visit my post at Altered Pages Artsociates.

Supplies used:
Sheet music paper, cut to size
Card stock

Come back again and see what other projects the Altered Pages Design Team has to share with you! 


Friday, March 11, 2016

Muse on the Nile

Marhaban!  That's how you say hello or welcome in Egypt.
 
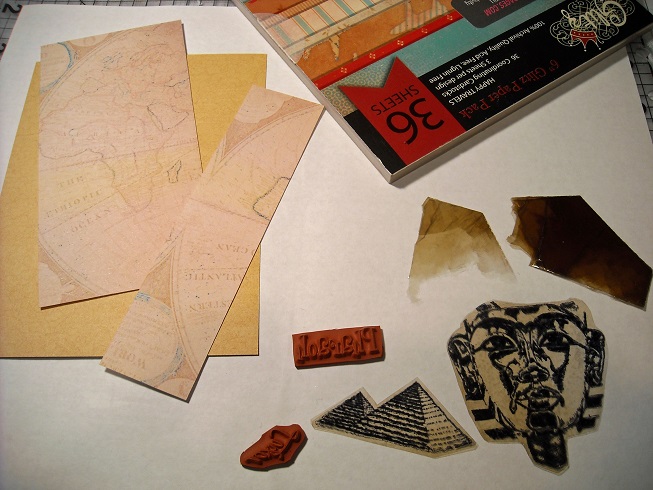
My post today, which is also featured on the Altered Pages Artsociates blog, is two greeting cards and a tag using the wonderful Muse On The Nile stamp plate and the Egypt collage sheet.  I've also got an altered tag as a little bonus.
 
 
The first card I made has King Tut's face and the pyramids stamped on thin mica chips with StazOn ink.  When you stamp on mica be sure to use a steady hand because rubber stamps may slide a little if you aren't careful.  It's a little like stamping on plastic.  Notice how dark the mica started out?  It's a rock that is formed of paper thin layers.  You can pull them apart to get the color you desire.  The pieces were attached with a glue stick.  Don't worry, you can't see the glue.


There is a globe pattern in the Happy Travels paper collection from Glitz.  I trimmed it down so keep the side with Egypt and set aside the other piece for a project later on.  The yellow background is from a Graphic 45 paper pad and has a very faint crackle pattern that isn't really visible here.  I thought it went well with the ancient theme.  Once the mica was glued in place I stamped the words from the stamp plate around the images.  The words in black squares were cut from the Egypt collage sheet.
 
 
Do you like the shiny bling?  I had a scrap of gold foil from another project.  I set the metal sheet on a mouse pad and used the tip of my ScorPal stylus to create this random pattern.  Then I cut a random shape from the piece and glued it in place with tacky glue.  I paired it with a gold glitter layer so that the gold metal wouldn't be overpowering for the rest of the card if it was the only shiny element.
 
 
I thought this chevron paper made a great background for an Egyptian card!  It hints at a pyramid, doesn't it?  I bought a sheet of the Egyptian collage on parchment from Altered Pages so the Pharaoh had a vague yellow tint and a blue/black design and it paired beautifully with this Glitz design.  The paper pad also had a solid dusky blue sheet and I stamped the pyramids on it to match the background.  Foam dimension squares hold the pyramids a little off the card.
 
 
As an accent piece, I used the Egypt collage printed on ivory colored paper so that it would blend with the shipping tag. 


List of supplies:
Muse on the Nile stamp plate
Mica Chips
Gold Foil
Glitz paper pads
Tacky Glue & Glue Stick
Double-Sided Adhesive
Foam Dimensional Adhesive
Scor Pal
StazOn Ink Pad
Egypt Collage Image Sheet 
Yellow Tag Alphabet Collage Image Sheet
Shipping Tag 
 

www.alteredpages.com