Pages

Friday, April 25, 2014

Gift box for tea or trinkets


It’s Friday!!  Hurrah!  I’m happy to be back with another project as part of the Altered Pages Design Team.  We are continuing our month-long partnership with Unruly PaperArts and Leaky Shed Studio products.  I have an origami project to share with you today.  I recently purchased a disk from HSN during Craft Month (a.k.a. March) and it has a wide variety of cards and 3D projects on it.  I love this little triangle box.  In keeping with the RAQ theme this month of Tea Cups and Tiaras, it’s the perfect size to hold a tea bag and a little treat. 
Sometimes origami can be a little complicated for me, but I was able to get this one right the first try and it only took a few minutes.  You need one sheet of 12x12 scrapbook paper.  It can be single or double sided.  I chose a two-sided pattern because I liked the thought of having a pretty inside to the box.  You don’t want card stock for the box part of this project because it will make the folds too bulky.  I am using Graphic 45 French Country paper.

Cut the paper to a 9x9 square.  The remaining 3” strip can be used for the flap that holds the box closed or you can save it for another project.  The DVD did recommend using card stock for the flap but the G45 paper is such good quality that I went for it.
Click for a larger image
Score your paper at 3” intervals both horizontally and vertically.  IMPORTANT:  You want the very center square to be flat.  At each corner of the middle box, score a line out to the corner of the paper to cut the section in half diagonally.  Do all four corner boxes this way.  Decide which direction you want your finished paper to face because you are only going to score the sides of the box.  The front and back 3” panels will not have folds. 

The middle panel on each side now needs to be divided into thirds.  Turn the paper so that the two sides are at the top and bottom when you look down at it.  Score the middle sections so that when you are complete the (temporary) top row looks like a “W” and the (temporary) bottom row looks like an “M”. 
  • FOLD ALL DIAGONAL LINES AS MOUNTAINS
  • FOLD ALL PERPENDICULAR LINES AS VALLEYS.
Cut out your flap from either coordinating paper or card stock so that you have a 3” square with a 3/4" flap on one side.  Score the flap line and then score another line in about 1/8” further in.  This small section is to allow for the folds when the box is complete.

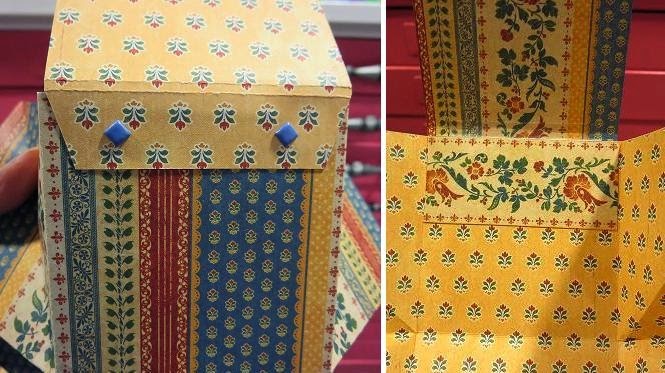
There are a lot of embellishment opportunities on this project.  You can decorate the front and back of the box itself as well as the front and back of the flap.  You can even decorate inside the box!  Because I used a tape runner to attach the flap I chose to embellish with brads on the back for added strength.  A strip of the same paper was attached inside the box to cover up the plain metal strips.
I printed two copies of the Altered Pages Victorian Tea collage for the front of my box.  One image of the lady drinking tea was cut into a scalloped oval and the other was used just for the flowers on her hat.  Once the oval was cut I used a Colorbox Cat’ Eye pad in Colonial Blue to tint the outside edge.  The oval was positioned over the flowers and both were adhered to a red 3x3 panel, which had been embossed with a polka dot pattern.  
The inside panel where the flap is adhered was decorated with a chipboard crown from Leaky Shed Studio that was dipped in Warm Red Colorbox Chalk ink.  A G45 sticker and a stamped sentiment were added.
"I wish we could sit down together and drink a cup of tea.  But since we can't when you have this one I hope you think of me."
The box is sealed with a Velcro closure (cut in half) but there was room to decorate on the front panel, too!  I added a hand-cut banner from the same paper and another darling tea cup image from Altered Pages.
After that, only the goodies remained!  A tea bag and a tasty candy treat are snuggled into the small space for a cute little gift.
Thanks for sticking with me through that very long description. I promise it’s an easy project and will work for many different occasions!
Products used:
Hot Off The Press Teresa’s Fantastic Folded Cards & Boxes DVD
Graphic 45 French Country Collection Déjà Vu 4500634 (12x12)
Graphic 45 French Country stickers – Friend definition
Cup of tea saying by The Stamp Barn
Colorbox Colonial Blue
Colorbox Chalk Warm Red
Velcro & brads
Visit Unruly PaperArts for more projects and inspirations!

My project can also be seen on the Altered Pages blog.  Stop by to see more projects and tell them I sent you!

www.alteredpages.com

Tuesday, April 22, 2014

MOO Art Greeting Card


Hello friends!  It’s Trending Tuesday over at the Altered Pages Artsociates blog.  Every month a different crafty trend is highlighted and the whole team joins in the fun!  We are teaming with Unruly PaperArts and Leaky Shed Studio in April to bring you some fun projects with … MOOs. 

A MOO is a small piece of art that can either stand alone or be part of a larger project.  The monthly theme over at Unruly PaperArts is “Mail Art and MOOs” so I’ve incorporated mine into a greeting card with (faux) postage today.

I found this wonderful cream colored paper from Art Papers Online.  Textured paper is a great way to add some dimension and interest to a card project.  Several layers of the three Colorbox chalk inks shown were added to it.  These are the only inks used throughout the project.  I started by simply rubbing the stamp pad over the ridges.  Then I used sponges to add more layers.  Finally, I dipped the edges in the dark brown ink pad to give it a defined edge.

Because my theme for this card was “Paris” I chose to use the rubber stamp set from Altered Pages’ sister company, The Mailbox Muse.  These wonderful red rubber stamps were part of the All Things French kit.  The butterscotch ink was sponged onto a sheet of cream card stock and then stamped with three stamps - “evening in” “Paris” and the Eiffel Tower in the dark brown.

Two collage sheets of faux postage from Altered Pages were used for the images on the MOOs.  I was so excited to have a reason to use my patterned scissors!  Using the postage stamp edged pair I cut out several of the more colorful images that I thought would blend well with my color scheme.  I brushed the edges with butterscotch ink to highlight the fancy cut. Each MOO is 1 1/8” by 2 3/4” and two images fit perfectly on each one.  They were adhered with an Elmer's X-treme glue stick and then I trimmed the excess and inked the edges.  A wide band of burnt sienna went around each of the MOOs and then a thinner band of dark brown on top.  After dipping each side into the brown ink pad, a Fleur de Lis brad was added to one on the corner to balance the flower attached to the other side of the finished card.

I smooshed the Leaky Shed Studios crown down onto the dark brown ink pad so that it would have an even coating of ink.  Once it was glued onto the card three tiny Prills by US ArtQuest were added to it over the laser engraved pattern.

Everything was adhered to the textured paper using Helmar 450 Quick Dry glue.  I went with liquid glue because the paper is extremely bumpy.  I wanted to be sure the images stuck well.  I admit that I did weight the whole thing down with a sheet of bubble wrap and a heavy book…just to be sure!
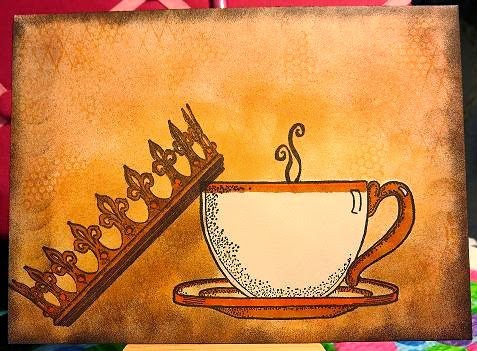
And what would mail art be without an envelope?  The space for the receiver's name is reserved by using my favorite (retired) tea cup image from Auntie Amy.  Then I stamped the Stampendous! crown at an angle and added a little Stampin' Up steam.  Both images were colored with Bic Mark-Its permanent markers.  After masking the cup, the same three Colorbox chalk inks are sponged around the cup and the rest of the envelope.  Two textured stamps inked with the butterscotch ink were added at random to give it a little texture.

Be sure and come back on Friday for my next design team post!  Happy crafting!

Supplies:
Art Faux Postage collage sheet
Paris red rubber stamp set
Fiskars Postage pattern scissors
Brown flower – Michael’s dollar bin
Tea Cup stamp from Auntie Amy
Crown stamp by Stampendous!
Steam stamp from Stampin' Up
Mini Circle texture stamp from Sin City Stamps
Diamond Grid stamp by Stamp Camp
Oriental Trading Company Fleur de Lis brad
Colorbox Chalk ink – butterscotch, burnt sienna, dark brown

Friday, April 11, 2014

Mail Art - an all-in-one card


Hello and welcome to my first post as part of the Altered Pages design team!  I appreciate the opportunity to share my art with you!  This month, Altered Pages is teaming up with Unruly Paper Arts, which is a BlogZine with wonderful art, and Leaky Shed Studio products.  Their theme this month is Mail Art and Moos.  I had never heard of a MOO before.  We’ll get back to that.  First, let’s see my mail art project!

The Unruly Paper Arts April issue features an RAQ (ReaderArt Quest) challenge for their readers to play along and create using a theme and a visual prompt.  Teacups and Tiaras was the theme this month.  I made an all-in-one greeting card/envelope combo.

If you have an envelope template that would make an awesome starting point.  I don’t have one so I cut mine out by hand to measure 10” x 7 1/4”.  Using the paper in portrait format, score in 3/4” on each side, 2 1/2” up from the bottom and 3” down from the top.  Fold along all lines and then cut out the four rectangle pieces in the corners as shown.

To create the inside greeting panel I used a Prima stencil and Versa Mark ink to give the background some texture. 

While that was drying I started on the chipboard crown from Leaky Shed Studio.  These little crowns are beautiful and since they are laser cut some of them have intricate patterns.  I chose to gild the crown for this project so I chose a plain surface.  I brushed on a coat of US Art Quest Duo adhesive.  Once it was ready I brushed on the gold leaf by Gildenglitz.  It created a beautiful shiny gold finish.  I used a Leaky Shed teacup on this project, too.  It was painted with bright blue acrylic paint with a matte finish.  I wanted the only shiny thing on this project to be the crown!

I chose several images from Altered Pages collage images for both inside and outside of this project.  I’ve provided a list and links below for you. 

Finally, I knew I wanted a border at the top and while I was looking for one…I found three!  All of them again from my favorite Bazzill package.  (I’m starting to run out of these so I had better get some more!)  The swirly border was cut in half to use as steam for the teacup.  All four were inked with Dark Brown Colorbox Chalk Ink. 

Because the envelope is part of the card I thought a word of caution was warranted and wrote “Open Gently” across the flap. 

Now, what’s a MOO, right?  For anyone who doesn’t know, they are bigger than an inchie and smaller than an ATC.  They measure in approximately at 1 1/8” by 2 3/4”.  I think they make cute little pops of color and design.  Altered Pages has a page of MOO backgrounds or you can certainly make your own. 

Products used on these projects:
Leaky Shed teacup & saucer (not used in this project)
“Queen for a day!” rubber stamp by Where the Rubber Hits the Road (obsolete)
“Special Delivery” rub-on (company unknown)
Postage Stamp Outline rubber stamp (company unknown)
Red Rose tea string

Altered Pages collage images:
Lady with stole and hat – AP1401-Beautiful Blue
Lady with teacup – AP701-Vicorian Tea
Pansy group, flower & tea cups on MOOs – AP3032 Tea Party Flowers
Pansy (on tea tag) – AP1714-Blue Color Collage
MOO backgrounds – AP1638-Moo Backgrounds

Visit Unruly Paper Arts for additional inspiration.

Thanks for stopping by!  Until next time…Happy Crafting!

Sunday, April 6, 2014

Chinese Teacup Canvas

Hi everyone!  I want to share a project I did for a project for Altered Pages and Unruly Paper Arts.  The two have partnered in April to bring you inspiration this month.  My RAQ project is a 6x6 canvas board that I completed for the Unruly Paper Arts BlogZine.  RAQ stands for Reader Art Quest and is a monthly challenge open to all who follow them.  The theme this month is Teacups and Tiaras and there is a visual prompt to go with it.  Readers are encouraged to use the prompt in any way it inspires them and then to share their own projects on the Facebook feed.
I knew from first sight that I loved this dragon and that he was going to be on my project in some way.  I have a fondness for them anyway, but he is perfect for an Asian tea theme.
After painting the canvas pink, I used my Prima stencil with US Art Quest 101 Heavy molding paste.  I didn't want the shapes to be perfect so I kept the layer thin and did not fill every section of the stencil.

I chose my Altered Pages collage images and glued them onto card stock for a little strength.  Then I fussy cut out each one.  I distressed the edges of the Chinese poster.  Clear Stickles went onto the edges of the cup and saucer to bling it up since dragons are always drawn to shiny objects! The little embellishments (corners, mask & blue disk) came from Altered Pages.  My husband recently bought me the color kits as a birthday present.  The lace was in my Fringe and Fedoras kit from Mailbox Muse, which is a sister company to Altered Pages. 


Collage images used:
"Two Chinoiseries" and "Perfect Tea" - AP518-Tea Party
Dragon - AP334-Dragons
Tea Cup - AP3032-Tea Party Flowers
Rose - AP733-Flower Chromolithographs

Thanks for stopping by!  And check out my first OFFICIAL post as a member of the Altered Pages design team over on their blog on April 11th!!   I will be posting on the 2nd & 4th Friday each month.  You can see a different project from each team member every day!  So check back often.

Want to make my day?  Leave me a comment below.
Happy Crafting!